What’s New in Risk Automations: 4 Templates for Vendor and User Risk
.jpeg)

Most vendor onboarding and app access work is waiting and follow-ups. Waiting for someone to notice a form came in, assign a tier, chase a questionnaire, or dig up the context behind a Slack request. Risk Automations workflows remove that wait and automate the follow-up. A trigger fires, and the workflow runs to a concrete outcome: a ticket created, a message sent, a risk tier assigned.
To make those workflows easier to launch, Risk Automations includes an ever-expanding template library. This post covers the four newest additions: two focused on Vendor Risk and two for User Risk.
Every template below is a starting point, not a locked configuration. You're free to customize each one to fit the tooling and processes you already run (ServiceNow, Jira, Microsoft Teams, Slack, or Asana).
Risk Automations templates
In this blog, we cover four of our newest additions to our expanding library, what triggers each one, and the workflow it runs.
1. Vendor onboarding automation
Onboarding a new vendor typically means juggling risk tiering, ticket creation, and multiple stakeholder emails by hand. This template collapses it all into one automatic sequence, triggered the moment a new vendor request comes in.
As soon as someone submits an onboarding request, this template automatically handles vendor intake and setup. It assigns a risk tier, initiates monitoring, opens a tracking ticket, and loops in the internal owner and vendor, setting up the security questionnaire that follows.
Trigger: New onboarding request submitted through the vendor onboarding portal.
Workflow steps:
- Retrieve the onboarding request and pull the submitted information and answers.
- Automatically assign a risk tier using either your preset Vendor Risk settings or AI-driven guidance.
- Start monitoring the vendor.
- Update the vendor's tier.
- Create a ticket in your preferred ticketing platform (for instance, ServiceNow or Jira).
- Send a stakeholder email to the internal vendor owner.
- Send a welcome email to the vendor contact, notifying them that a security questionnaire is coming, stating the expected timeframe, and introducing a point of contact.
- Send the security questionnaire.
The automation replaces a manual, multi-step onboarding checklist with a single trigger, so risk tiering and monitoring start immediately with no lag between intake and oversight. Both sides stay informed: the internal owner receives a ticket and an email, while the vendor receives a clear welcome email outlining expectations and a point of contact. This sets up the handoff to the next template by sending the initial questionnaire.
So vendor onboarding stops being something your team waits on and becomes something that’s already underway, with tiers assigned and monitoring in place before anyone even reviews the ticket.
2. Automating security questionnaire follow-ups
Sending the questionnaire is the fast part; it’s chasing down vendors who haven’t responded that takes effort. This template picks up exactly where onboarding leaves off, and handles the follow-up without manual chasing.
It pairs directly with the vendor onboarding template above, picking up after your team sends a security questionnaire and automatically nudging recipients who haven’t responded, on a recurring schedule.
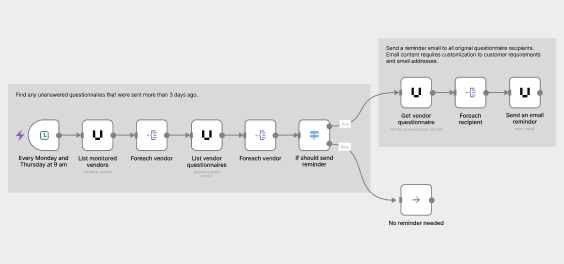
Trigger: Runs on a set schedule. Out of the box, it fires every Monday and Thursday at 9:00 AM, though the schedule can be modified.
Workflow steps:
- Pull all monitored vendors.
- For each vendor, look up their associated questionnaires.
- Check whether a reminder is due: has the questionnaire been sent and not yet responded to, and is it time to send a reminder?
- Pull the questionnaire information.
- For each questionnaire recipient, send an email reminder.
The template reminds only overdue recipients, so no one on the team needs to manually log who’s overdue, track it, or follow up with each one individually. It runs on a configurable, recurring schedule rather than a single one-off reminder, and checks the send and response statuses before sending a reminder.
It's not a nagging bot. Only overdue people get a nudge, so it reads as relevant follow-up rather than a flood of misfired reminders. It's also the natural companion to the vendor onboarding template; one starts the process, and the other makes sure it finishes.
Together, these two templates carry a vendor from first submission to a fully assessed relationship, with no manual follow-up required. For the broader strategy this fits into, read our guide on how to automate vendor risk management.
From here, the next two templates shift focus to User Risk.
3. Checking in on application usage before setting policy
Setting application policy without knowing how an application is used is a guessing game. This template goes straight to the source, asking users themselves rather than making a call based on incomplete data.
Gathering contextual information directly from users helps teams make better application policy decisions. When a decision needs more context, this automation reaches out to all or selected application users, sending a Microsoft Teams message by default.
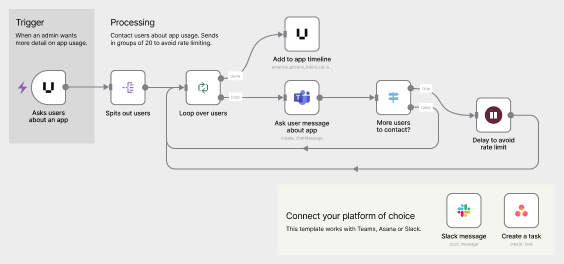
Trigger: An administrator asks users about their application usage.
Workflow steps:
- The admin initiates a request to ask selected users about their app usage.
- The automation sends a message (or creates a task) to each selected user about their app usage.
- UpGuard records the action on the app’s timeline in the platform.
The workflow integrates with Microsoft Teams out of the box but can be quickly modified to send a message via email, Slack, or Asana.
The result is that first-hand evidence replaces hours of manual correlation. Teams set policy based on how people actually use the application, not on a "best guess" pulled from a usage dashboard.
4. Routing application access requests without multiple back-and-forths
Application access requests tend to arrive as scattered Slack or Teams messages, or emails, each missing half the context an administrator needs to act. This template standardizes the whole request-to-decision process from the moment it's submitted.
The workflow sends every access request from the User Risk browser extension straight to the team's system of choice, typically a Microsoft Teams channel message.
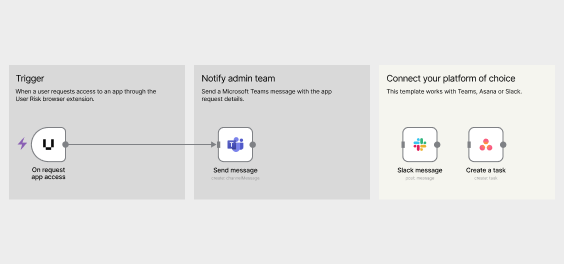
Trigger: A user requests access to an application directly from the User Risk browser extension.
Workflow steps:
- The user submits an app access request through the User Risk browser extension.
- The automation notifies the admin team by posting a message through Teams or Slack with the request details.
- The admin team reviews the request and decides the outcome in the UpGuard platform.
Administrators get consistent information with every request, with no back-and-forths needed to gather context, and approval or denial decisions are made and recorded directly in the UpGuard platform. Because requests originate from the User Risk browser extension, the relevant app is already captured with no extra input needed.
One submission arrives as a fully contextualized decision rather than a Slack message an admin has to chase details on. So security teams can enforce consistency across the business by replacing random messages with a single trackable process.
Deploy these Risk Automations templates today
Vendor onboarding, questionnaire follow-ups, application usage checks, and access request routing look like four different problems on the surface. Underneath, they’re the same shift happening four times over. Work that used to wait on someone to notice it, pick it up, and chase it down now starts the moment a trigger fires and keeps going from there.
The four templates above are ready to deploy now. That's fewer manual steps for your security team to track. See what this looks like inside your own environment.
